Tag Archives: DIY

The Tagline from ScrapMills.com

This is a post from ScrapMills Signs and More

Wood&Concrete

Since our launch, our tagline as been “hand-painted custom signs” and it’s worked. It’s short and to the point. But while it’s been accurate, it’s been uninspired.

Sure we make hand-painted custom signs, but I think we do more than that. We want to be more than that. It was time for a change.

We wanted to change it not because we wanted to separate ourselves from everyone else who makes things from reclaimed wood. We wanted to share what makes us who we are, why we do what we do, and why we like doing it for others. We came up with this:

“Making who you are, a part of where you are”

You can buy things from any store and hang it on your wall or put it on your shelf, but we want to offer something more than that for our customers. We want to take a little piece of your individuality and allow it to make wherever you are, reflect who you are.

-Tyler

Leave a comment

Filed under Blogging, Life

On Simplicity; From ScrapMills

This post is from ScrapMills Signs & More

—————————————————

“In character, in manner, in style, in all things, the supreme excellence is simplicity.”  | Henry Wadsworth Longfellow

As our business has grown, so have our tastes and preference for the work we do. There are a ton of websites and online stores where you can purchase reclaimed wood signs. We want our work to be different. We have discovered that when given the option we would most always lean towards the feeling of simplicity in our projects.

And there’s a reason for that.

Our goal is to allow our work to occupy a space, not take it over.

We enjoy letting our signs be discovered, rather than be something that jumps out for attention as soon as you walk into a room. We hope anything you get from us becomes apart of your home and feels organic, like something you’ve owned for years. We work hard every day to make this evident in each thing we create.

The greatest thing about this work is that we enjoy the process as much as the finished product. Thank you for supporting us along the way!

MasonJar

Leave a comment

Filed under Blogging, Life, Writing

Launching Scrap Mills Signs & More

Scrap Mills Logo

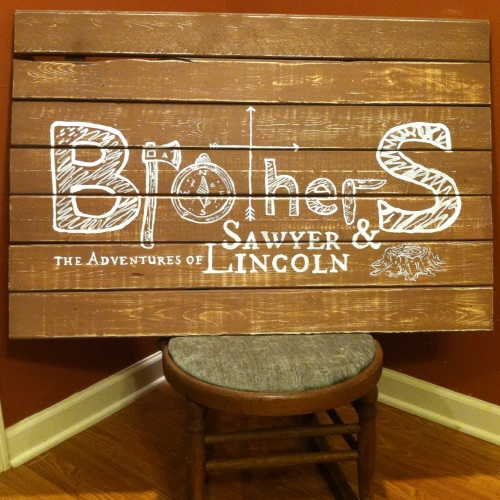
I’m excited to announce that my wife and I have launched a side gig called Scrap Mills Signs & More. We specialize in custom, hand-painted signs and some other small household items.

Scrap Mills Sign

I started making little things around the house out of necessity when my wife wanted something out of a catalog or Pinterest. I’d just say, “Oh I can make that.” It was really just an attempt to appease her but soon she came to collect.

After the first few projects I realized it was something I really enjoyed. And she approved.

With her support and encouragement we decided to share some of the things we’ve done so far with others.

I’ve been amazed at the great readers I’ve received from my site. Half of the support from anyone here would be more than I could ask for.

Please visit our site and share it with others. Check it out and let us know what you think.

Thank you for all your support! It doesn’t go unnoticed!

-Tyler

Leave a comment

Filed under Blogging, Life, Men

Working on Something . . .

Saw cord

I took this picture after I accidentally cut right threw the cord on my saw. It took some patience but I was able to wire it back together. It still works like new today. I love this picture because what had the potential to totally stop my in my tracks turned into something that looked amazing. It was a quick moment and a good lesson to learn. The reason the continue working is because that’s your quickest route to success.

I haven’t been posting much recently but I have a good reason, not just because I’ve been lazy.

I’ve been working on something pretty big and will ready to announce it this Saturday.


1 Comment

Filed under Life

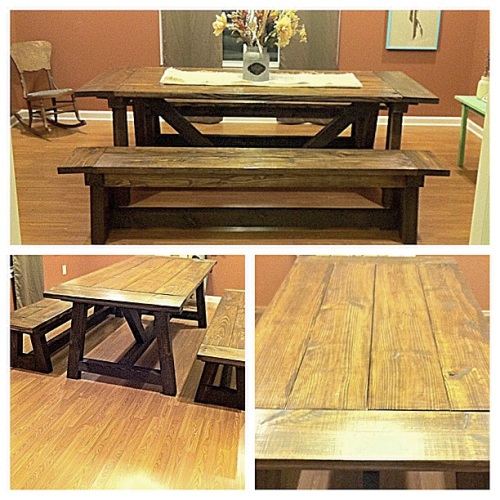
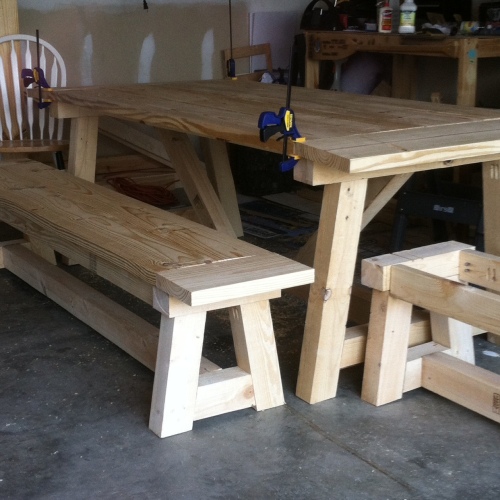
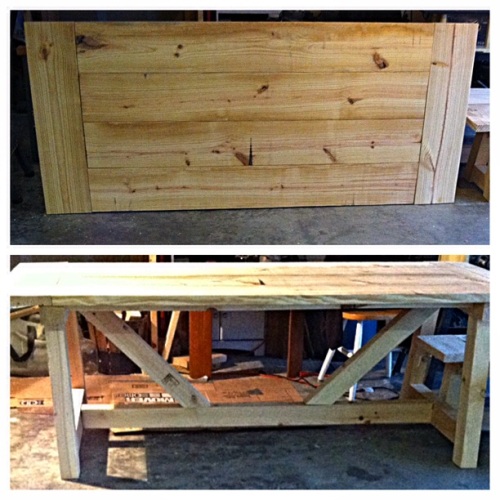
My DIY Farmhouse Table [4×4 Truss Beam]

DIY Farmhouse Table

DIY Farmhouse Table 2

I have been wanting to make my own dining room table for years now. I’ve loved the big tables and was not going to drop $3K for one from Restoration Hardware. I’d looked at several plans but just never could find the time to get started. One day, out of the blue, my brother-in-law called me up and said he had 15 4×4 beams that were in a toss pile of a factory. He pulled them out and asked if I’d like them. I said sure and immediately started looking for a build plan using 4x4s. 

That’s when I found this plan by Ana White on Shanty 2 Chic for a 4×4 Truss Beam table. I ran through the plans and was surprised at the detailed instructions they provided. I decided to give it a try.

It took much longer than I had anticipated, mostly because I made several errors along the way. Thankfully I had enough wood to make up for any mistakes. But after a few weeks it came together and what started out as a Christmas present for my wife was finally finished right before Valentine’s Day.

Here’s a few tips I’d give to anyone attempting to build a table like this:

  • Buy a Kreg Pocket Jig and start using it now – This little tool was instrumental in making this table and I’ve used it for several other projects. Play around with it on some scrap pieces of wood and get a good feel for it.
  • Get some extras – Whether you’re a newbie or a weathered expert, mistakes are going to happen. Make sure you have at least some extra wood before you begin. This way you won’t have to stop in the middle of a project to make a run for more lumber. Whatever you don’t use will be there for your next project. I had so much extra I decided to make matching benches for the table. I also got these plans from Shanty 2 Chic as well.
  • Make the time –  The hardest part about this project for me was the time. We have two boys (two and three) so any time I planned to work on the table had to coordinate with my wife’s plans. This worked out well as she wanted to table done as badly as I did (probably more).

Table 1 Table 2 Table 3

I was excited to finally have the table completed and ready to use.

Farmhouse Table 1 Farmhouse Table 2 Farmhouse Table 3 Farmhouse Table 4

Family Table1

Here's the Christmas present I did get finished on time.

Here’s the Christmas present I did get finished on time.

If you liked this post you may also enjoy:

2 Comments

Filed under Life, Tutorial

How to Make Your Lady Happy: The DIY Dating Game

Dating Game

I’m obviously not a dating expert, but I have been married for several years now. Over this time I’ve learned that having a great relationship with your spouse doesn’t just happen. It takes work and time and communication. So here’s a little game I’ve done to make the time you have with each other a little more special.

The last time my wife and I went out on a date we played this game. Here’s a list of questions to ask your spouse. You each take turn picking questions. The catch is that anything you ask, your spouse gets to ask you back. It’s a great way to make sure your conversations don’t stay on the surface level. A great tip is to ask a follow-up question. If there’s more there that you haven’t heard before, ask it. It’s a fun and interesting way to learn more about the person you love.

1.       What are some books you’ve really enjoyed?

2.       What books would you like to read sometime?

3.       What are your favourite foods?

4.       What did you want to be when you grew up?

5.       What is some of your favorite memories from your childhood?

6.       What are some of the more difficult memories from your childhood?

7.       What are you favorite hobbies?

8.       What did your parents teach you that you appreciate now?

9.       What did your parents say or do that you found difficult?

10.   Who is someone that inspires you?

11.   What do you like us doing together?

12.   What would you like to do together in future, just the two of us?

13.   What would you like to do together in future, all of us with the kids too?

14.   What is your favorite passage of Scripture?

15.   What is your favorite memory verse?

16.   What are your greatest strengths?

17.   What are your greatest weaknesses?

18.   What overwhelms you?

19.   What is concerning you?

20.   What are you fearful of?

21.   Are you content at present?

22.   What makes you happy?1

23.   How can I add to your happiness?

24.   What do you find attractive about me?

25.   When did you know you wanted to marry me?

26.   What are some of your favorite memories of us?

27.   How do you like me saying ‘I love you’ the most—words, gifts, or touch?

28.   How can I demonstrate my love for you in different ways?

29.   What do I do that irritates or frustrates you?

30.   How can I help you be a better husband/wife?

31.   How can I help you be a better father/mother?

32.   How can I better meet your physical needs and desires?2

33.   How can I better meet your emotional needs and desires?

34.   What can I do to encourage and support you better?

35.   Where do you see us in 5 years time? In 10 years time?

36.   Is there anything in your heart that you need to forgive me for?

37.   In what ways do you think we love differently?

38.   In what ways do you think we parent differently?

39.   Describe to me your relationship with God at present.

40.   Tell me about a memorable time you connected with God.

41.   What do you love about each of our children?

42.   What hopes and dreams do you have for each of our children?

43.   What are you most thankful for?

44.   How have you changed since we married?

45.   What do you like about our marriage?

46.   What would you like to change about our marriage?

47.   What spiritual gifts to you see in me?

48.   Is there anything you regret?

49.   Tell me something about yourself that I may not know.

50.   What are some of your greatest hopes?

These sample questions are taken directly from Intoxicated On Life. Check them out here.

If you liked this post you may also enjoy:

Leave a comment

Filed under Marriage

How to Make a Wooden Sign

How To Make  Wooded Sign

If you have internet access or picked up a Pottery Barn catalog one at some point in past year you’ve probably heard something about pallets, wood, signs, and do-it-yourself. There’s endless ‘pins’ all over the internet of DIY projects with cool font and some group of words that everyone is supposed to have in their home like “Live, Laugh, Love” or “Wipe Yo Feet.” So rather than pay for shipping from some Etsy store in Nebraska, I thought I’d give it a try myself.

It turns out it’s not hard at all. It takes some time and some practice, but it’s not too bad.  Here’s how I did it.

Wooden Sign 1

I started with a block of scrap wood like this. You can use this small piece as a paper-weight, desk decoration, or use it as a nightstand for your phone as seen here. Once you feel comfortable with the process you can use the same technique and move on to something bigger.

Wooden Sign 2

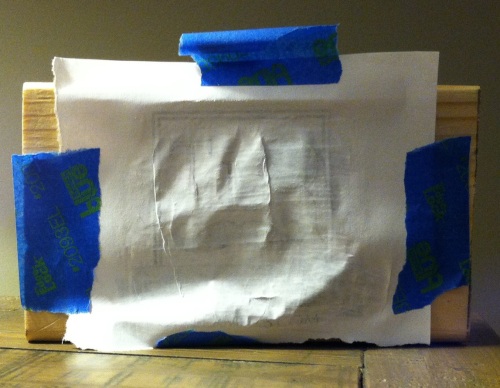
I found the design/graphic I wanted, reversed the image, then printed it out using a standard inkjet printer. Be sure to reverse it so the image will press on to the wood properly. I cut it out and secured it to the block of wood using painters tape. Then I wet the paper slightly with a damp rag. You can also use a damp paint brush to lightly dab water. You don’t want to get the paper too wet, just barely.  Then use something to rub the ink onto the wood. I used a Sharpie permanent marker. You use the marker to press the ink only. You keep the lid on and use it to press the ink from the page to the wood. This part is tedious but if you take your time and go slowly, the better the end result.

Wooden Sign 4

After you’ve got the image pressed you can sand it down for an ‘aged’ look or paint over it with a brush.  Here are some other items I’ve created:

MILLS graphic Mills 2

I made this simple design and reversed the image. I just printed it on a full sheet of paper and pressed it to a plank of scrap wood. Then sanded it down.

Christ the Lord 2 Christ the Lord 1

This one took a little longer than the others. I built the board and printed off each word on an individual sheet of paper. I pressed the ink to the wood and painted each letter with a fine brush.

But that’s how I’ve done it so far. I’m still working on some others and seeing how they turn out. These are great ideas for gifts or a simple way to personalize an area with something you did yourself.

Leave a comment

Filed under Tutorial

A DIY Christmas Card Tree

DIYtree1

Thanksgiving has come and gone and left us all a little heavier. Black Friday gave way to Cyber Monday and now our wallets are a little lighter. Soon our mailboxes will feel their weight of the holiday season as Christmas cards are coming.

You’ll get picture postcards with holiday borders. You’ll get the awkwardly long card that is taller than all the others. People will send you pictures of their kids while others will send you pictures of their dogs. Hopefully no one will just send you just a picture of his or her self as single people are not allowed to send Christmas cards to anyone.

But soon these season’s greetings will begin to pile up. You’ll try to put them on your fridge but soon it becomes too many. A slight knock to one and you’ve set off an avalanches of cheers, best wishes, and ’tis the seasons.

Don’t let this happen to you. For the cost of a few dollars you can build a simple Christmas card tree. Here’s how:

DIYTree2

For a few dollars I bought two pieces of wood, an eight foot 1×3 and an eight foot 1×1. I cut the 1×1 into a five foot piece.

DIYtree3

I cut the 1×3 into staggered lengths, 2.5 feet, 2 feet, 1.5 feet, 1 foot, six inches, and finally four inches.

DIYTree4

I painted each “branch” with acrylic craft paint and spray painted the 1×1 stem brown. Then I sanded each piece of wood to rough it up.

DIYTree5

I laid each branch out seven inches apart from each other and nailed them to the stem using some finishing nails.

DIYtree7

I put a little picture frame holder on the back and asked my wife where she wanted it. I picked up some small clothespins later and glued them on. Now I’m just going to wait and hope we get a ton of Christmas cards. Otherwise I pretty much wasted a Saturday afternoon.

If you enjoyed this post you may also like:


3 Comments

Filed under Tutorial

Working On More Than Just Words

Working on more than words

I’d like to think of myself as being creative. There’s only one problem with that. You can get bored. Sometimes I get bored working withing the confines of one thing. I like to try a bunch of different things. So even though I haven’t made a post here in a few days, I’m not disappointed. Not if I can show something as a result of the time I’ve missed here. With that said, here’s a look at what I’ve been up to lately.

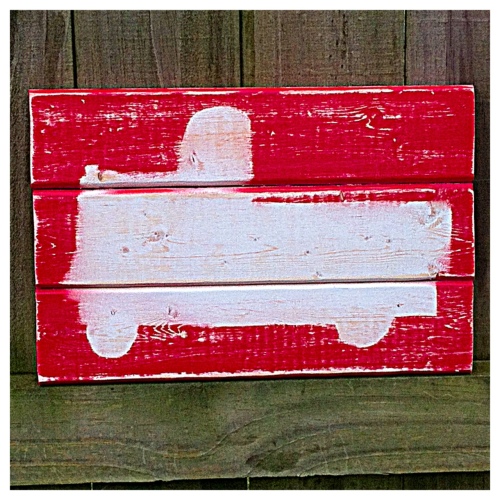
My youngest son turned two yesterday. We are having his party on Saturday. I’ve made a few things for his birthday, including his invitation. I’ve been playing around with a few other wood plank items to make. I’ve been pretty happy with how they’ve turned out.

Linc Invite L Silhouette Plane Silhouette Truck Sihouette

I made this Aldo Leopold bench for my front porch. After already making a simple bench for my back patio, I wanted to make a larger bench for my front porch. This one was super simple and looks great now decorated with pumpkins and mums.

Aldo Leopold Bench

Whenever my hands get idle, they do things like this. Whether I’m in a meeting, put on hold, or just generally not paying attention, I’ll start drawing. I’ve always liked to draw. Not in the struggling artist with a sketchpad type of way, just a simple past time. Here’s a few recent doodles.

Farm GTM

Creativity has to be fed. I get a lot from music. A few years ago I created a playlist called “Thinking” because those songs get the gears turning in my head. I’ve been listening to this song, pretty much on constant repeat. It’s amazing. Look it up and give it a listen.

You Make Me Brave

So that’s what I’ve been up to. If I’m notProcess blogging I try to make sure I’m still doing something constructive. Creativity isn’t limited by one medium. If you feel like all you are is good at photography, you’re shooting yourself in the foot. Try creating something different and you’ll be surprised at the process as much as the product.

Leave a comment

Filed under Life

Just Added


Last week I posted that I’d created a store on Etsy. I’ve added a few items including these small wooden items. I’ve been making mostly large wall hangings, but I tried making a few smaller ones and really like the way they turned out. They are great to fill out a small space on a wall or stand them up and add some personalization to a desk or table top. I added some hooks on one and have a cool place to keep our keys. Check them out if you get a chance. I’ll be making a few more soon.

US Map Small

Leave a comment

Filed under Life